


Hey folks! In today's blog, I am going to show you how to install Prometheus and run the Prometheus server as HTTPS that you can share with your friends. In this blog, I am using an AWS EC2 instance(t2.micro) to install Prometheus(allow all inbound traffic on Security Group) and AWS Route53 to manage my custom domain(this setup incurs a cost) but the same process applies for any compute (Virtual Machines etc). So let's get started.
Prerequisite
The only prerequisite to running the Prometheus server with SSL certificates is that you just need to bring your custom domain name. In this blog, I am using cmcloudlab352.info as my custom domain.
Introduction
Prometheus is an open-source systems monitoring and alerting toolkit originally built at SoundCloud. Prometheus collects and stores its metrics as time series data, i.e. metrics information is stored with the timestamp at which it was recorded, alongside optional key-value pairs called labels.
Letsencrypt is a nonprofit Certificate Authority short for CA providing TLS certificates for custom domains.
Certbot is a free, open-source software tool for automatically using Let’s Encrypt certificates on manually-administrated websites to enable HTTPS.
Table of contents
Download and extract the Prometheus binary from the official website
Create directories for Prometheus and move Prometheus binaries
Create a Prometheus service file and start the Prometheus server using systemd
Generate SSL certificates for your domain -- public crt and private key files
Configure the Prometheus server to run with SSL certificates
Step 1: Download and extract the Prometheus binary from the official website
Visit Prometheus' official website at https://prometheus.io/download and click on Prometheus from the list. Select the appropriate Architecture for your system.
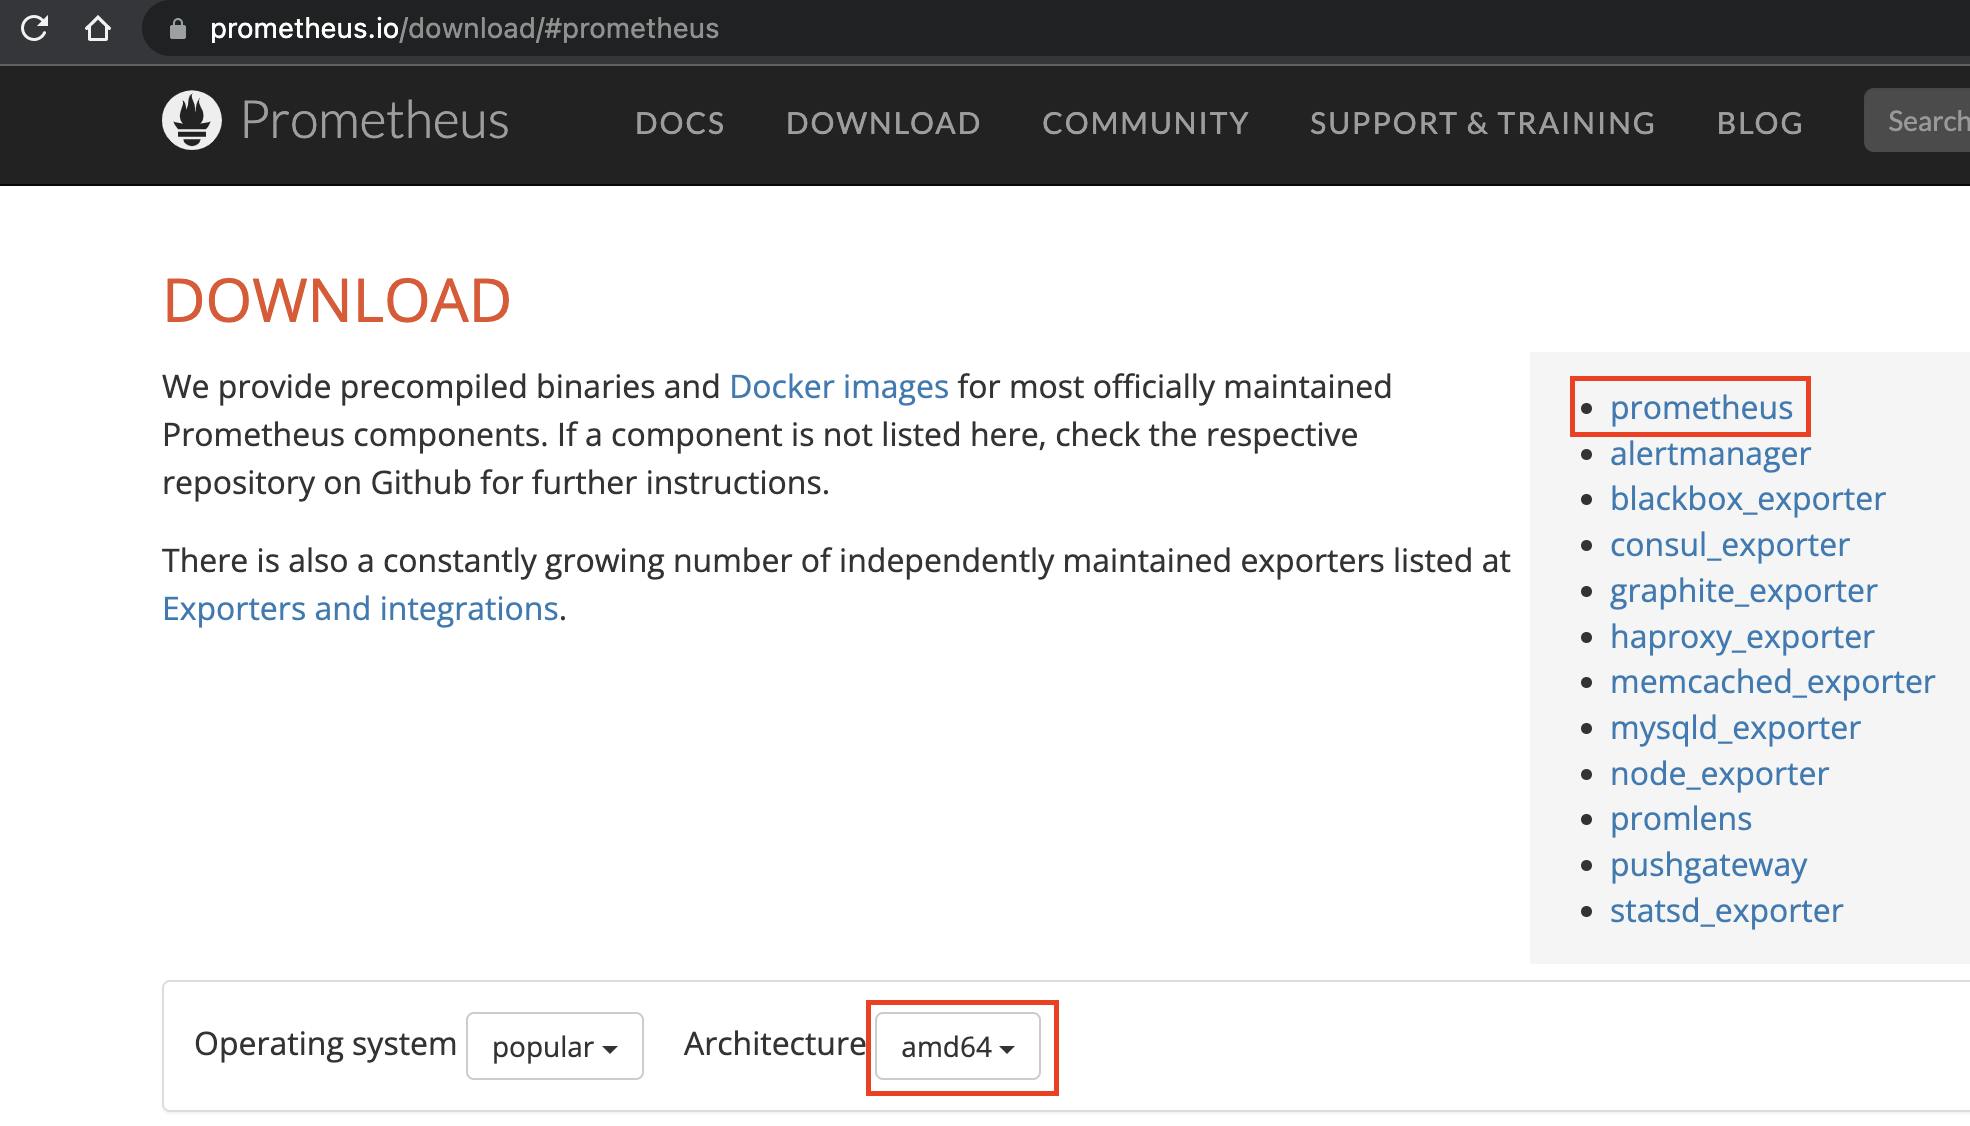
Login to your compute instance and run the below commands. Choose the appropriate Prometheus binary link
mkdir -p prometheus/prom
cd prometheus/prom

# Downlaod and untar prometheus binary
sudo wget https://github.com/prometheus/prometheus/releases/download/v2.42.0-rc.0/prometheus-2.42.0-rc.0.linux-amd64.tar.gz

sudo tar -xvf prometheus-2.42.0-rc.0.linux-amd64.tar.gz
Step2: Create directories for Prometheus and move Prometheus binaries
Run the below commands in the server
cd prometheus-2.42.0-rc.0.linux-amd64
# Create a prometheus non login user
sudo useradd --no-create-home --shell /bin/false prometheus
# Prometheus config directory
sudo mkdir /etc/prometheus/
sudo chown prometheus:prometheus /etc/prometheus/
# Prometheus Time Series Data Base(TSDB) directory
sudo mkdir /var/lib/prometheus/
sudo chown prometheus:prometheus /var/lib/prometheus/
# Move binaries to bin folder
sudo cp prometheus promtool /usr/local/bin/
sudo chown prometheus:prometheus /usr/local/bin/prom*
# Copy prometheus config files
sudo cp prometheus.yml /etc/prometheus/
sudo chown prometheus:prometheus /etc/prometheus/prometheus.yml
sudo cp -r consoles/ /etc/prometheus/
sudo cp -r console_libraries /etc/prometheus/
sudo chown -R prometheus:prometheus /etc/prometheus/consoles
sudo chown -R prometheus:prometheus /etc/prometheus/console_libraries

Step3: Create a Prometheus service file and start the Prometheus server using systemd
sudo vim /etc/systemd/system/prometheus.service
[Unit]
Description=Prometheus
Wants=network-online.target
After=network-online.target

[Service]
User=prometheus
Group=prometheus
Type=simple
ExecStart=/usr/local/bin/prometheus \
         --config.file=/etc/prometheus/prometheus.yml \
         --storage.tsdb.path=/var/lib/prometheus/ \
         --web.console.templates=/etc/prometheus/consoles \
         --web.console.libraries=/etc/prometheus/console_libraries

[Install]
WantedBy=multi-user.target
# any systemd service file change requires daemon reload
sudo systemctl daemon-reload
# Start prometheus service and enable it automatically after system reboot
sudo systemctl enable --now prometheus
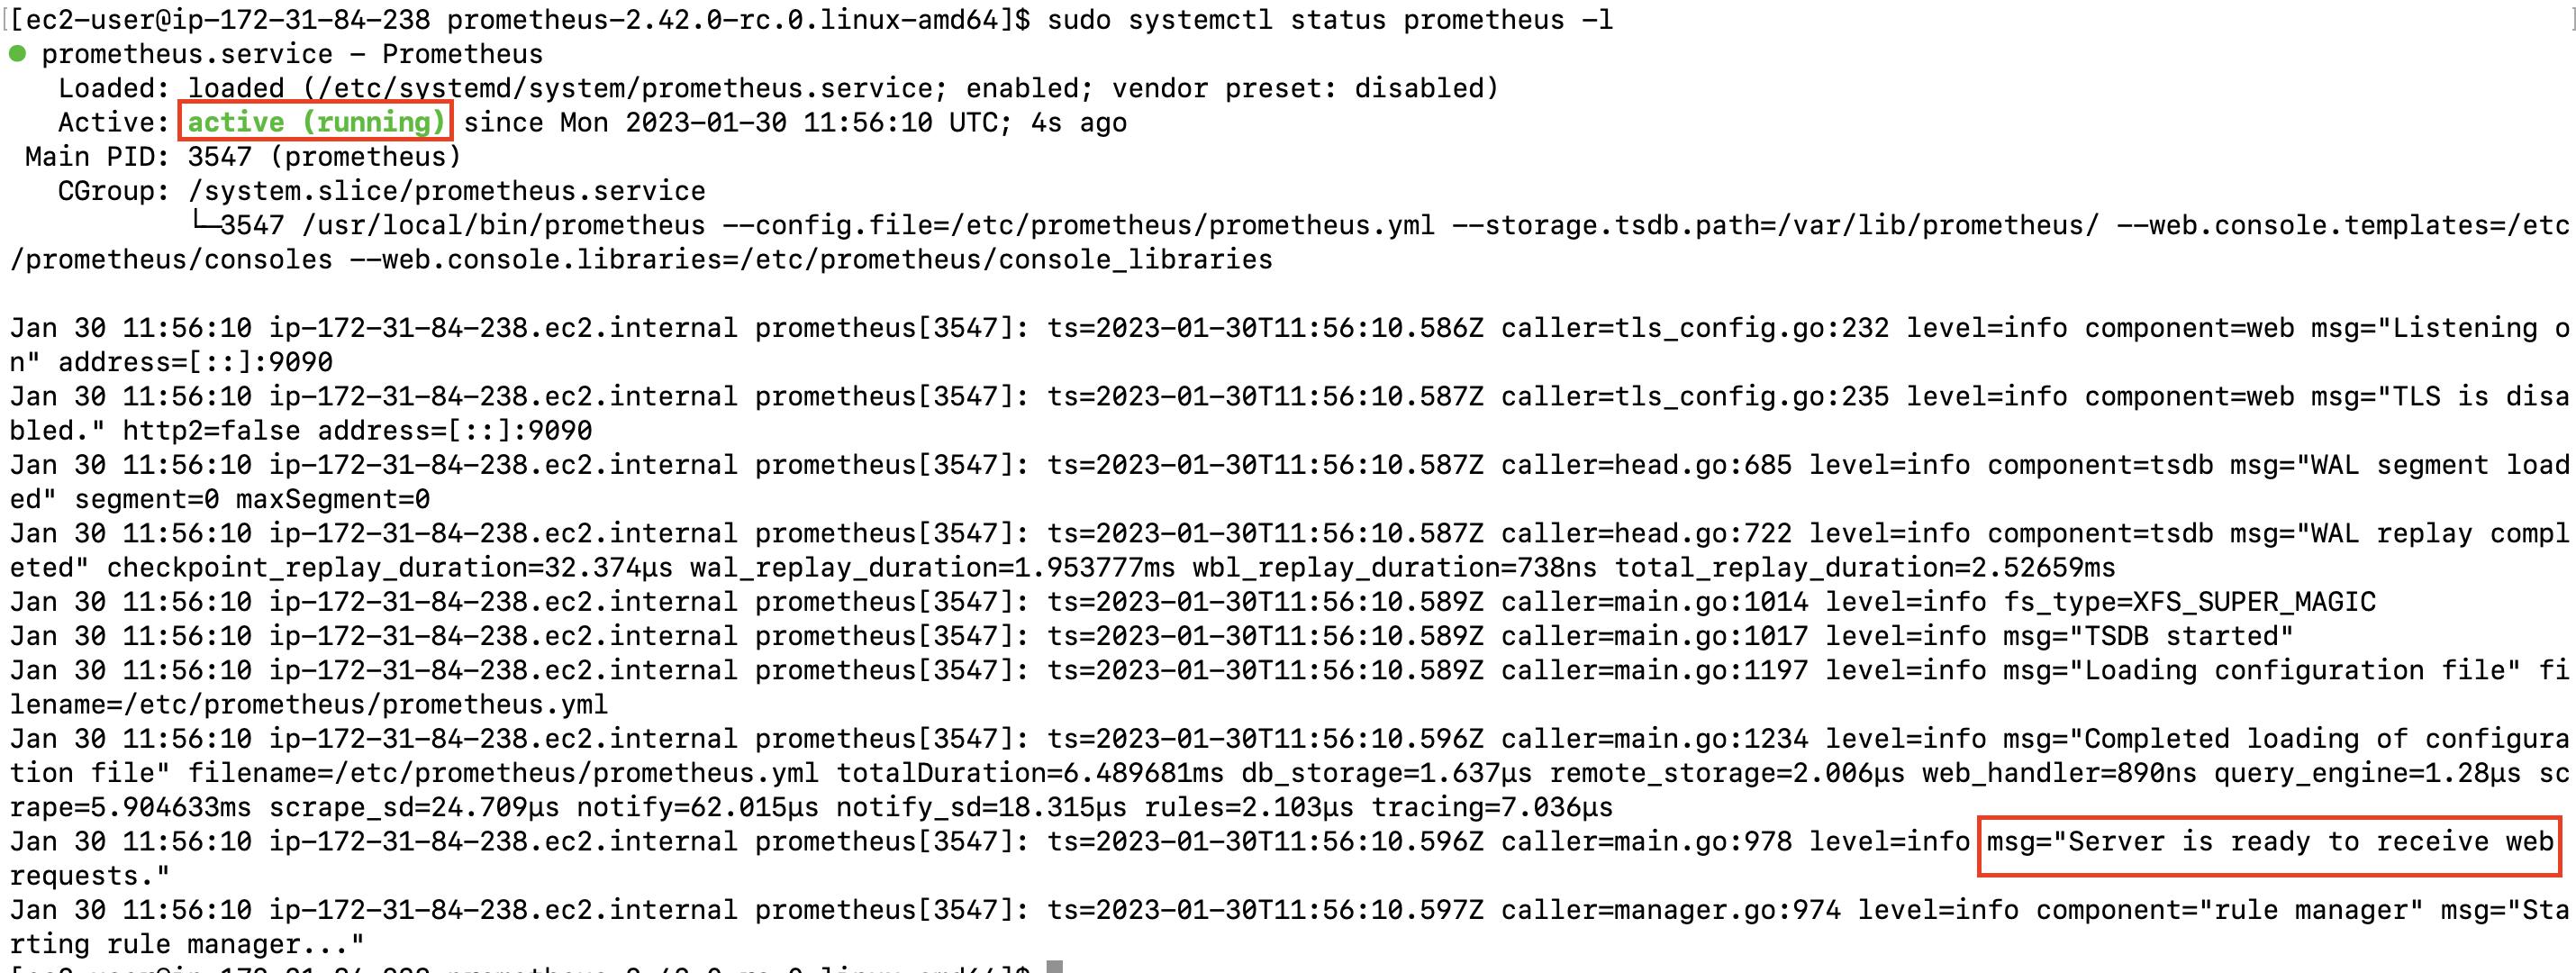
# see prometheus service status
sudo systemctl status prometheus -l
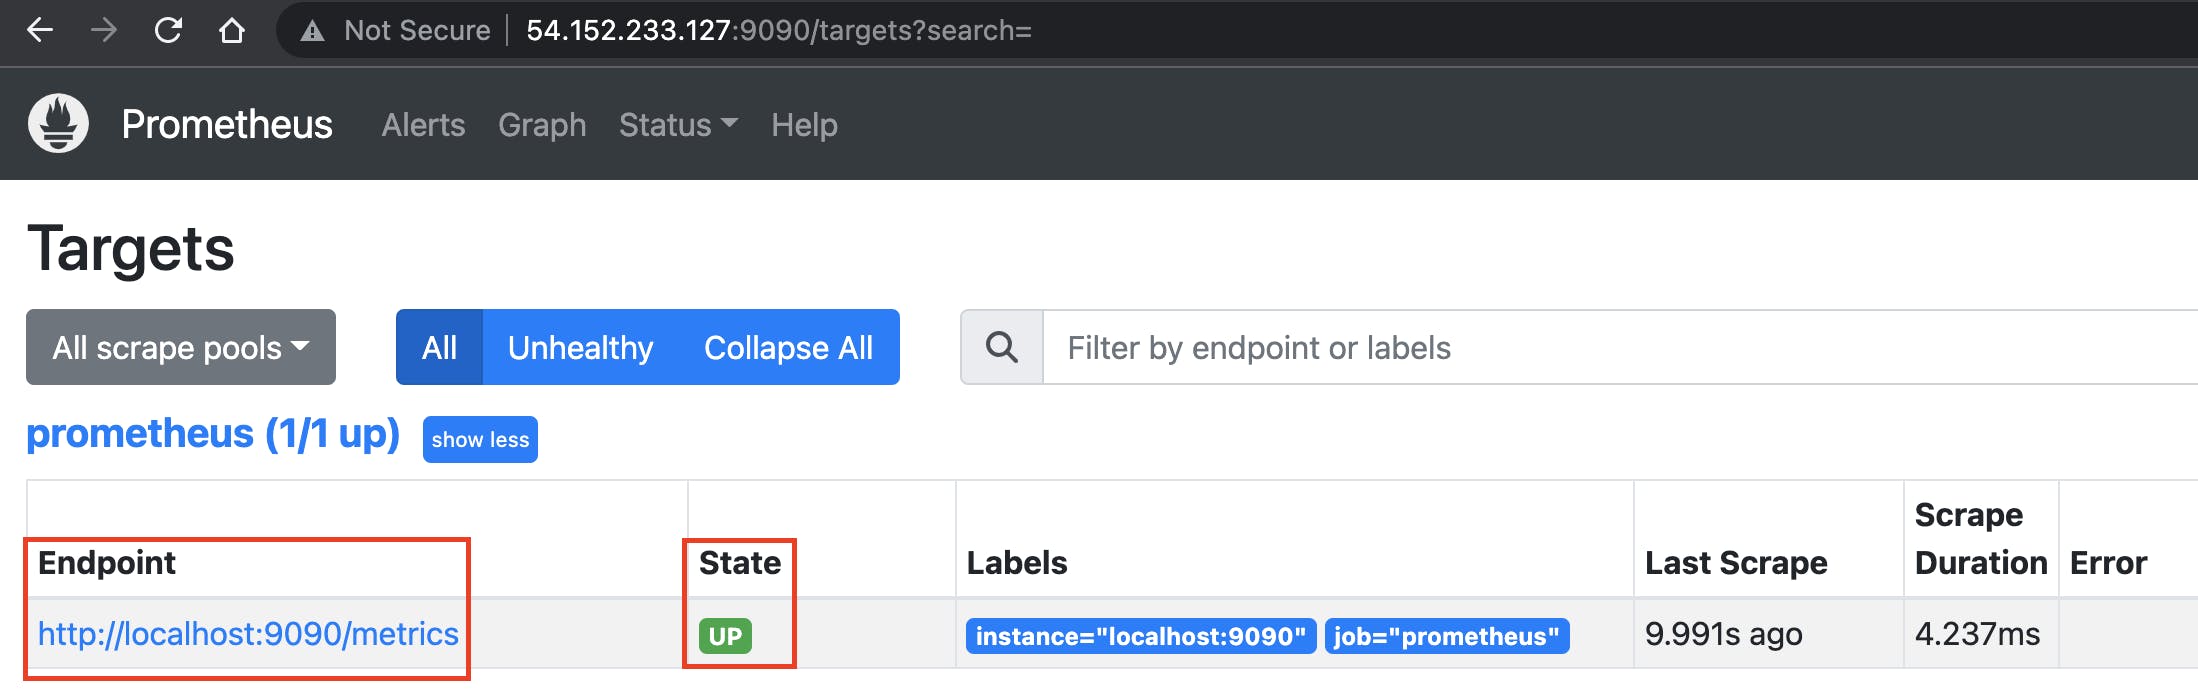
Type the below URL to check the Prometheus server is up and running. Remember to change the <public-ip>
http://<public-ip>:9090/targets?search=
Step 4: Generate SSL certificates for your domain -- public crt and private key files
To generate SSL certificates we will use free tools like Letsencrypt and Certbot.
Run the below command. Remember to replace cmcloudlab352.info with your domain name.
mkdir $HOME/certbot
cd $HOME/certbot
# Install certbot on centos based OS
sudo amazon-linux-extras install epel -y
sudo yum install certbot -y
# command to generate SSL files
sudo certbot certonly --manual --preferred-challenges=dns \
--email admin@cmcloudlab352.info \
--server https://acme-v02.api.letsencrypt.org/directory \
--work-dir=. --config-dir=. --logs-dir=. \
--agree-tos \
-d prom.cmcloudlab352.info
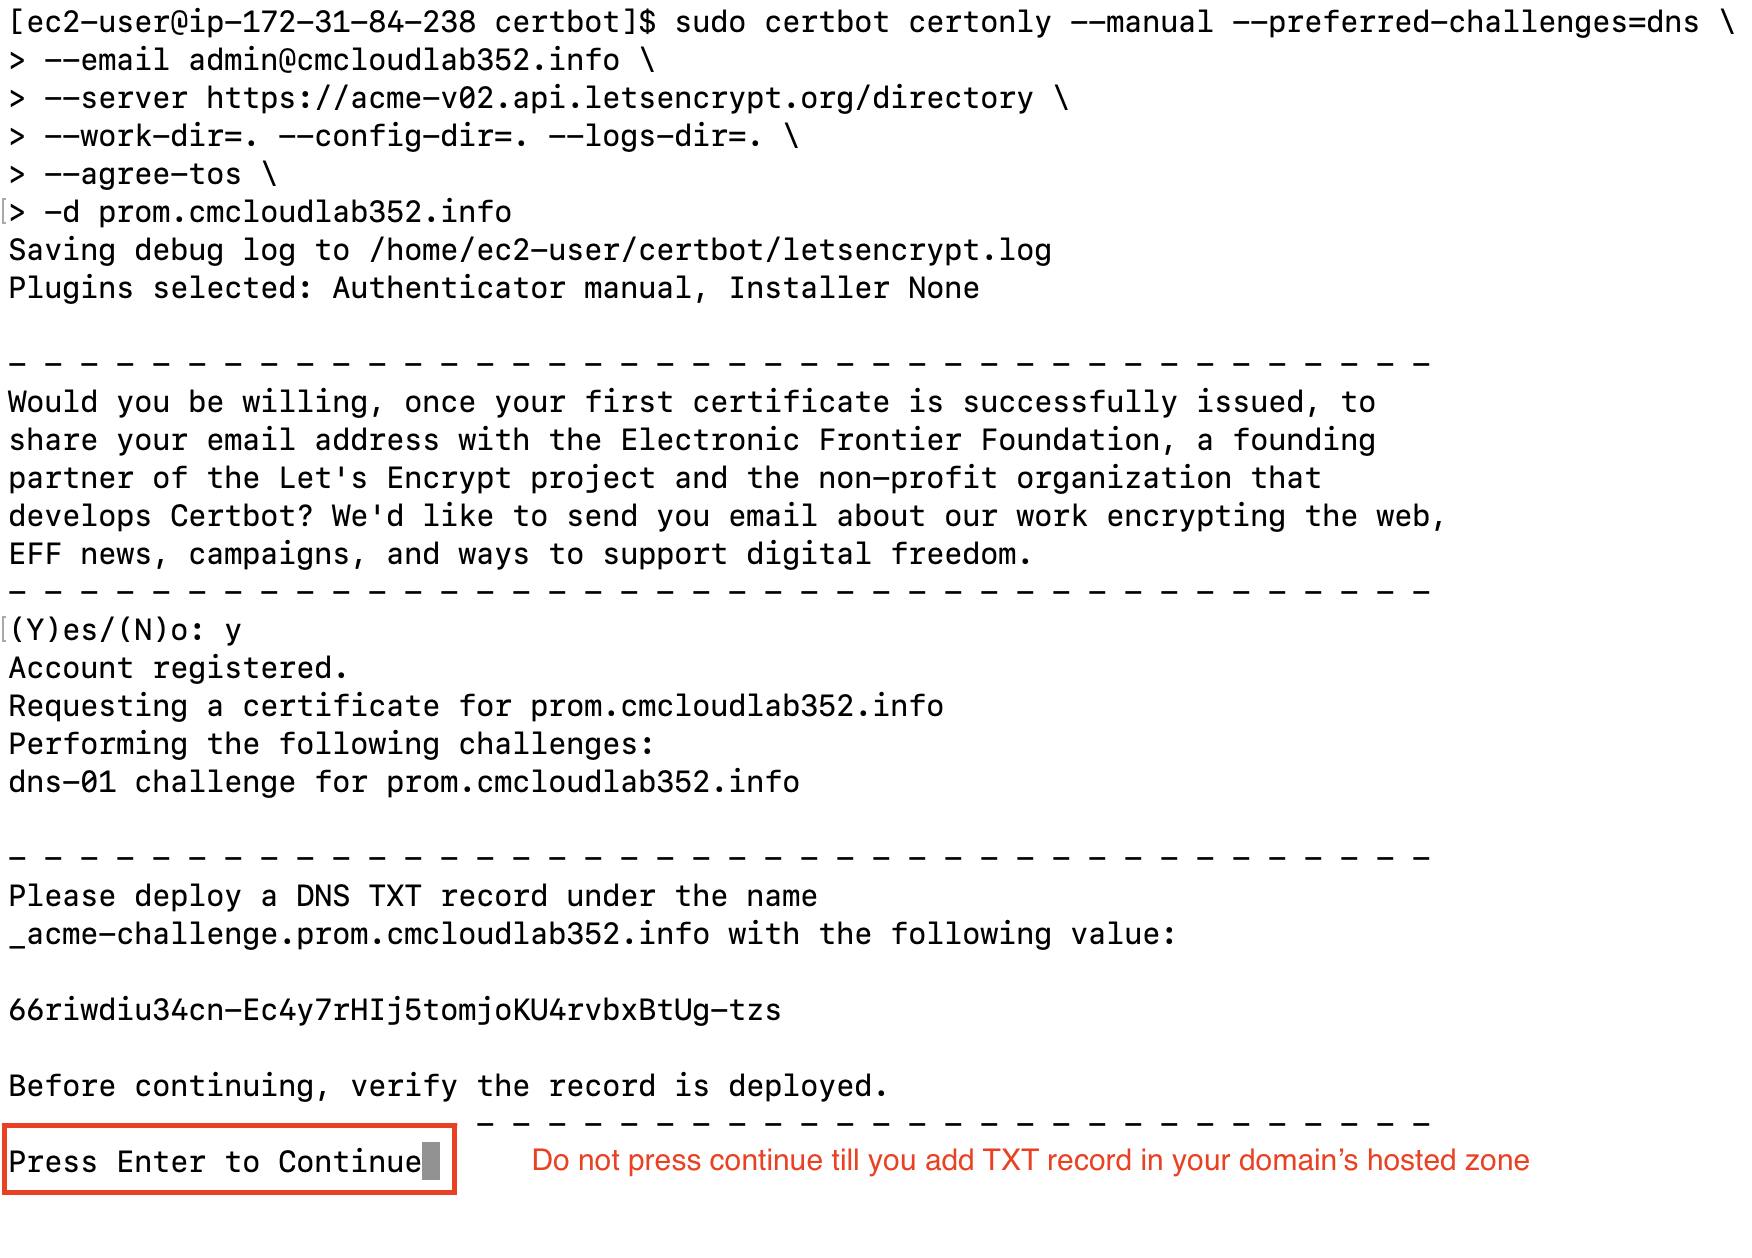
Do not press Continue until we configure the DNS TXT record
Add the above-generated TXT record in your Domain Hosted Zone.
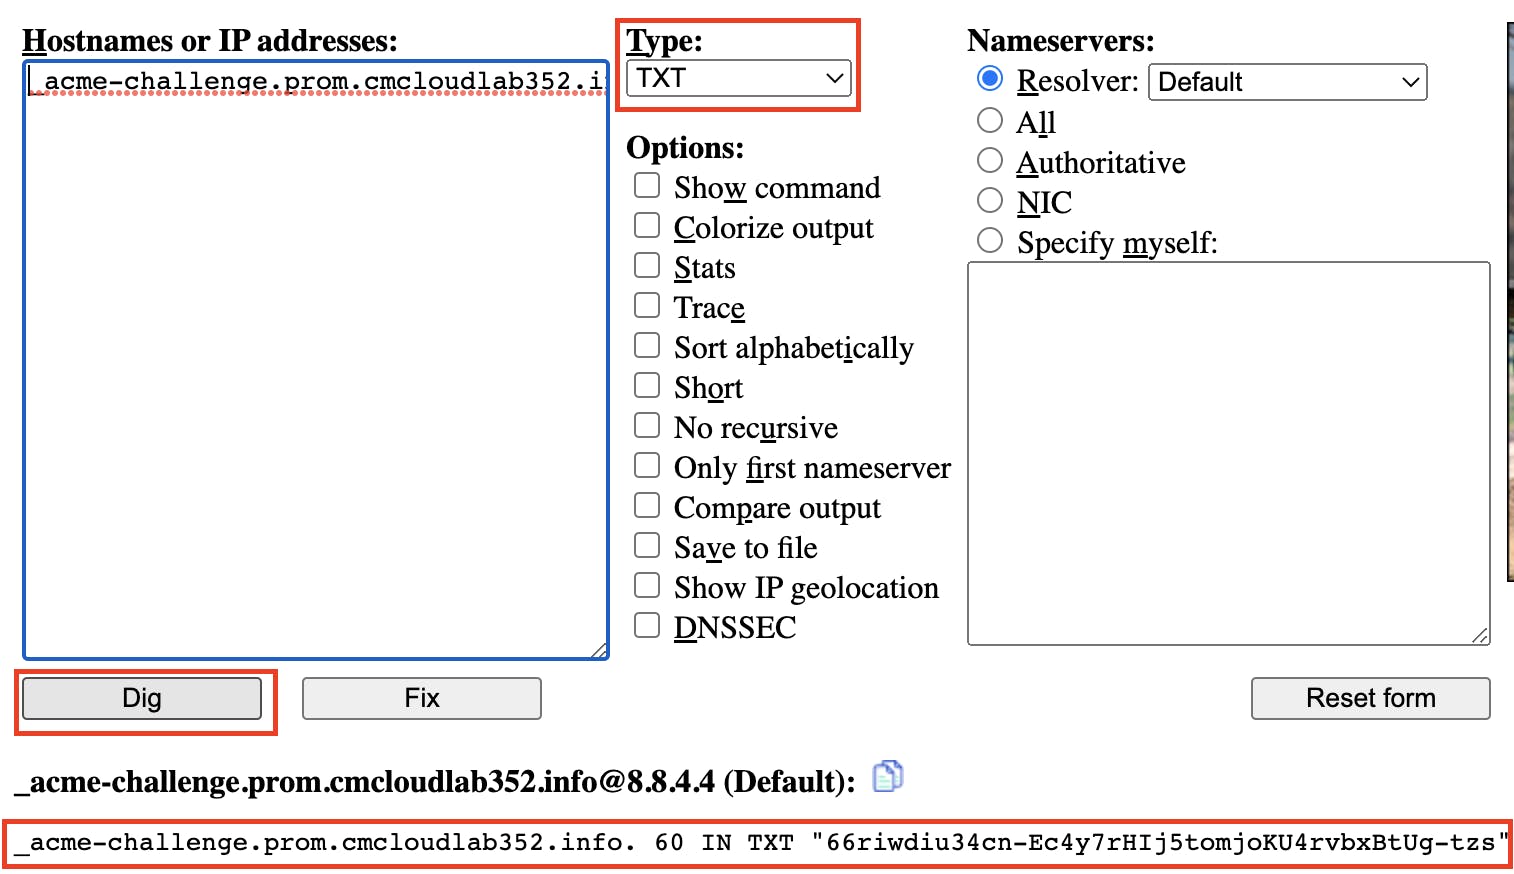
To check the successful DNS propagation of the new TXT record enter the name of the TXT record in the URL https://www.digwebinterface.com/
When its result is the same as the expected value then go to the terminal and press enter to continue.
This will create SSL certificates at the below location
sudo ls -l live/prom.cmcloudlab352.info

Step5: Configure the Prometheus server to run with SSL certificates
Move the above-generated SSL certificates to the Prometheus config folder
# SSL public CRT file
sudo cp ./live/prom.cmcloudlab352.info/fullchain.pem /etc/prometheus/prom_public.crt
# SSL private key
sudo cp ./live/prom.cmcloudlab352.info/privkey.pem /etc/prometheus/prom_private.key
# Change ownership of SSL certificates
sudo chown prometheus:prometheus /etc/prometheus/prom_public.crt
sudo chown prometheus:prometheus /etc/prometheus/prom_private.key
# Validate all files are under ownership of prometheus
ls -l /etc/prometheus/
Create a new file to configure SSL for Prometheus
sudo touch /etc/prometheus/web-config.yml
sudo chown prometheus:prometheus /etc/prometheus/web-config.yml
sudo vim /etc/prometheus/web-config.yml
tls_server_config:
  cert_file: /etc/prometheus/prom_public.crt
  key_file: /etc/prometheus/prom_private.key
Under the scrape_configs section, update the target's localhost to prom.<your-domain> and add scheme to https and tls_config section in the Prometheus config file to enable TLS. Please see the below code for reference.
sudo vim /etc/prometheus/prometheus.yml
scrape_configs:
  # The job name is added as a label `job=<job_name>` to any timeseries scraped from this config.
  - job_name: "prometheus"

    # metrics_path defaults to '/metrics'
    # scheme defaults to 'http'.
    scheme: https
    tls_config:
      ca_file: /etc/prometheus/prom_public.crt
    static_configs:
      - targets: ["prom.cmcloudlab352.info:9090"]
Now update the below line under ExecStart at the Prometheus service file to enable SSL
--web.config.file=/etc/prometheus/web-config.yml
sudo vim /etc/systemd/system/prometheus.service
[Unit]
Description=Prometheus
Wants=network-online.target
After=network-online.target

[Service]
User=prometheus
Group=prometheus
Type=simple
ExecStart=/usr/local/bin/prometheus \
         --config.file=/etc/prometheus/prometheus.yml \
         --storage.tsdb.path=/var/lib/prometheus/ \
         --web.console.templates=/etc/prometheus/consoles \
         --web.console.libraries=/etc/prometheus/console_libraries \
         --web.config.file=/etc/prometheus/web-config.yml

[Install]
WantedBy=multi-user.target
# Reload systemd daemon
sudo systemctl daemon-reload
# restart prometheus service
sudo systemctl restart prometheus
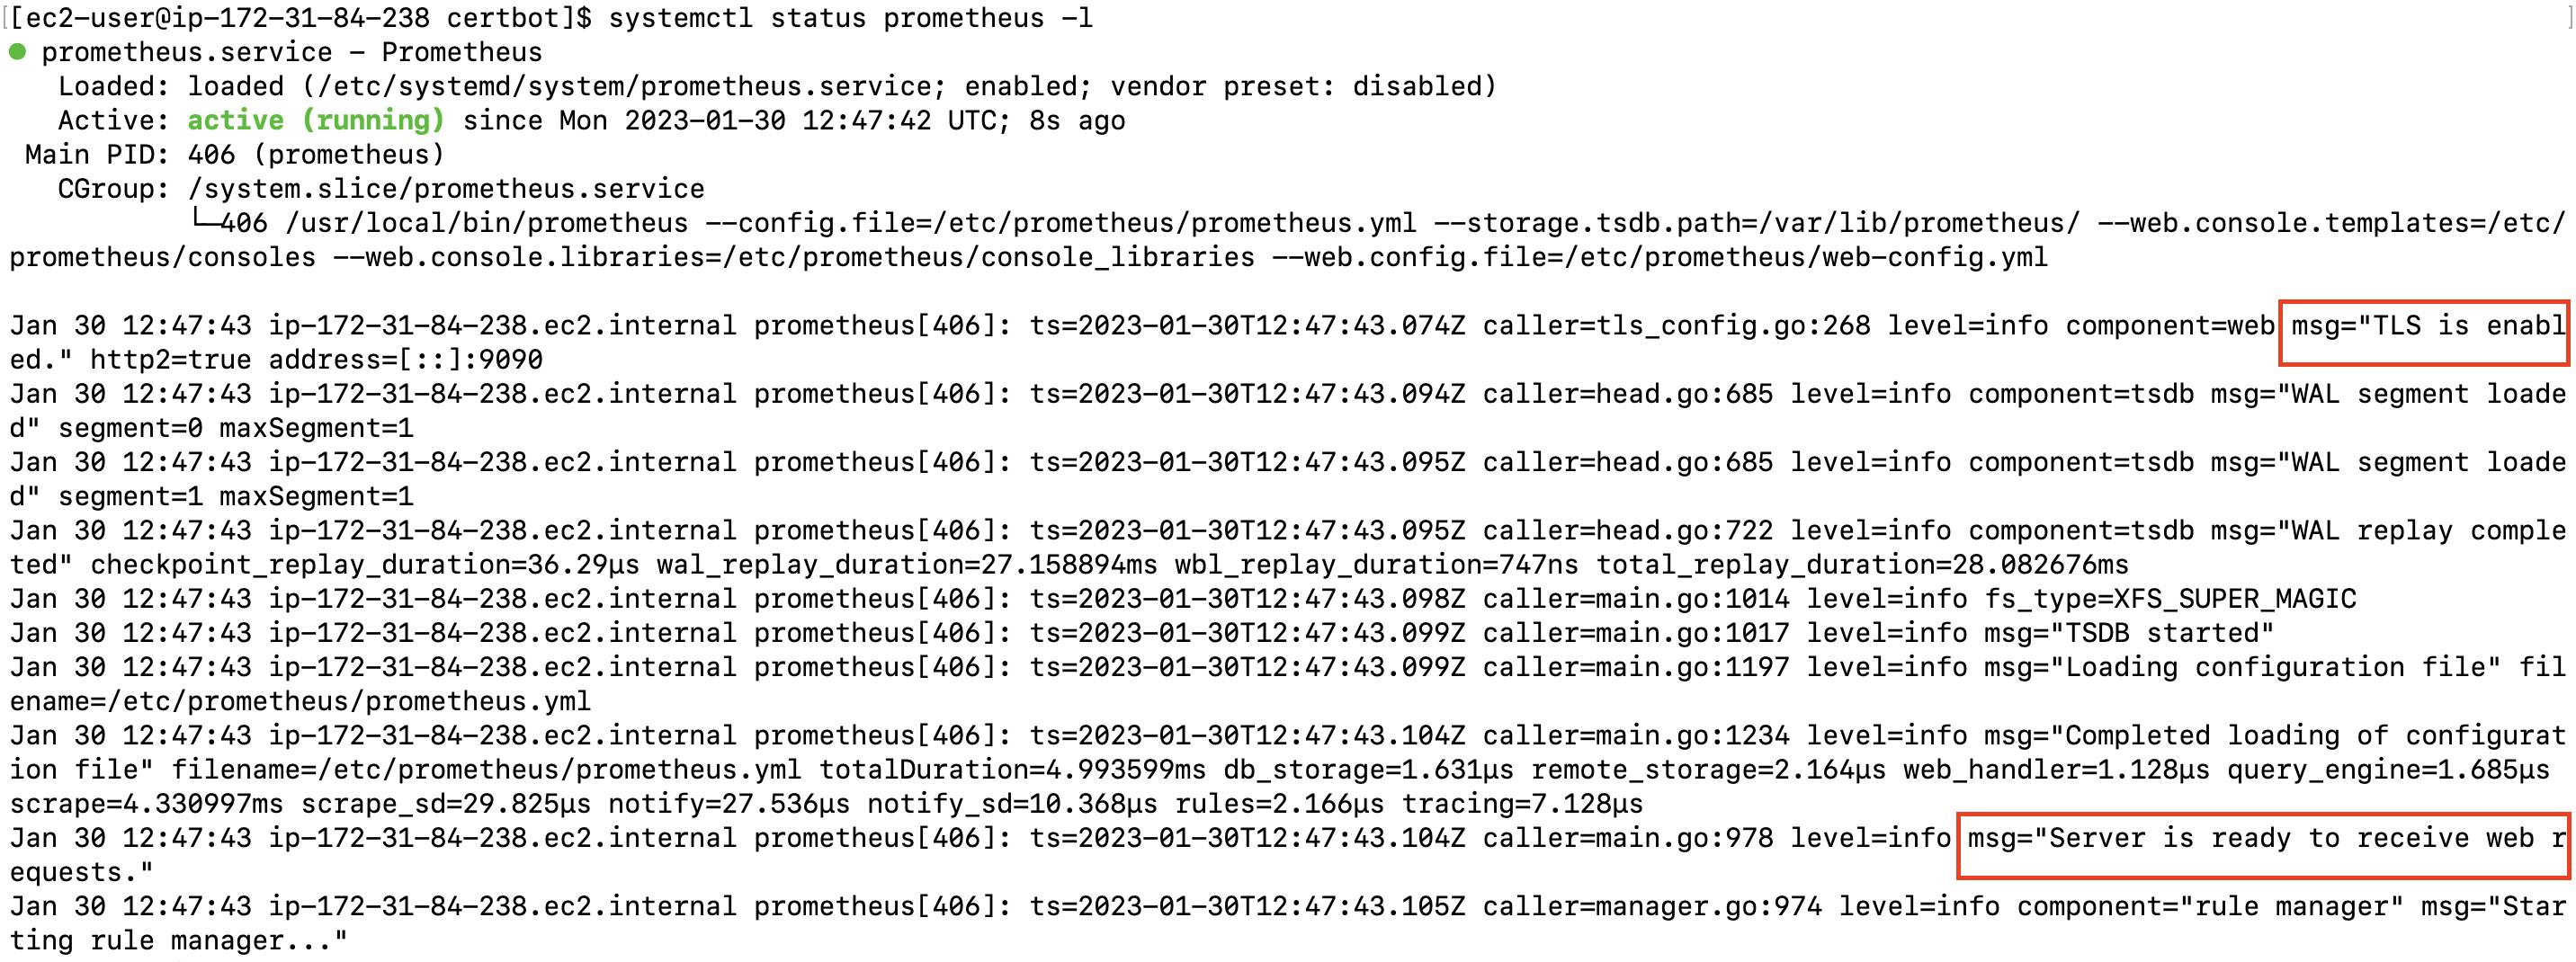
# check prometheus service status
systemctl status prometheus -l
In your DNS Hosted Zone add a new DNS A record with the below values
Record Name = prom.<your-domain>
record Type = A
record Value = <prometheus-server-public-ip>
Check the DNS route propagation of the above record at https://www.digwebinterface.com/
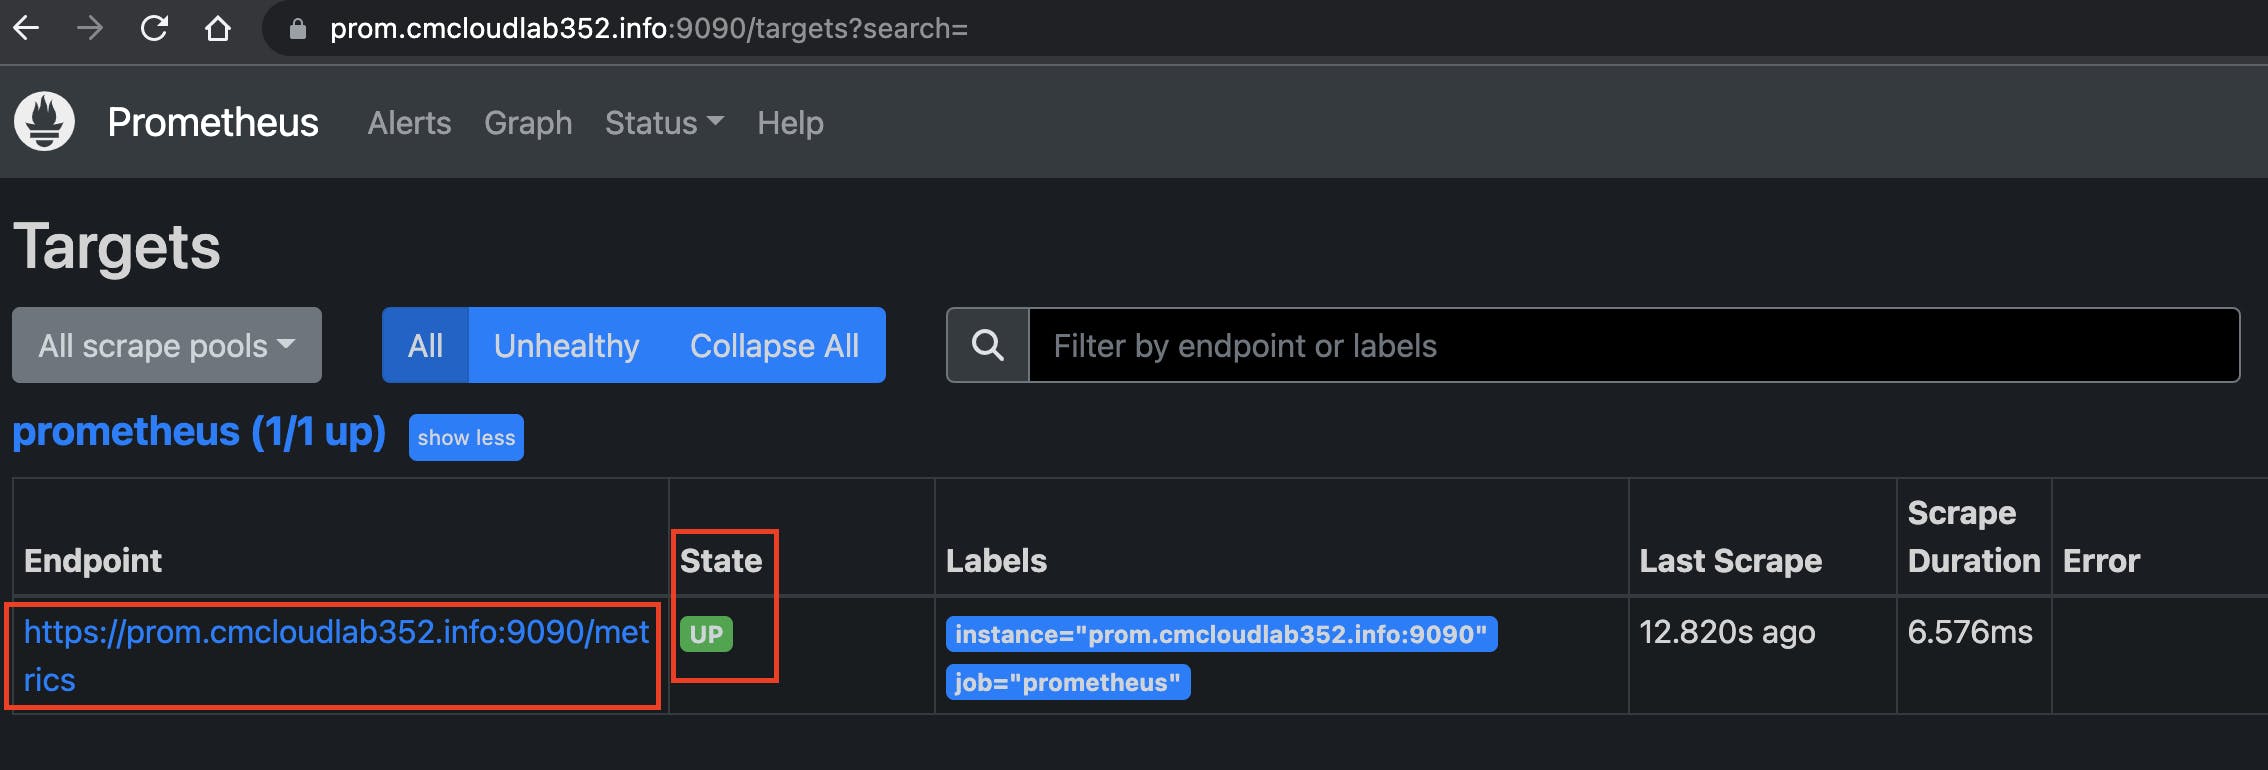
After successful DNS propagation, paste the below URL into a new browser tab
prom.<your-domain>:9090/targets?search=
Conclusion
So we have seen how can we set up a Prometheus server to listen to HTTPS protocol. Similar steps can be used to set up SSL configuration for almost any other server.
Hope you find this blog helpful. Till next time Happy Learning !!